moonstone
Tyre Kicker
This isn't as hard as it seems but it's time consuming. You'll need some torx drivers in various sizes, so I suggest you have a set before tackling this.
First pop the bonnet and remove the bonnet release handle. At the top edge of the handle there's a pushclip that holds the handle in place. Lever this out with a small flat-head screw driver and you can now simply pull the handle off the spindle. IMPORTANT - DO NOT CLOSE THE BONNET WITHOUT THIS HANDLE BEING ON THE SPINDLE OR YOU'LL HAVE A NIGHTMARE GETTING IT OPEN AGAIN!
Next you're going to remove the trim piece around the handle spindle that runs along the top of the grill. You'll pull this up (trim removal tools are best) from the front edge and then pull it up and out towards you. You'll see that the rear edge clips into the top of the airscoop.
With this out of the way, you'll see two torx screws that hold the top of the grill to the chassis. You're going to remove these but it's worth taking a couple of photos first as there's some adjustment back and forth in order to line the top edge up with the lights and bonnet. If you take a couple of pics it'll help as a reference when you re-position it.
Rest of the bumper is held in by screws inside the wheel arches and underneath. It's also clipped into the bodywork. The photos below show you where the screws are that you need to remove:
Each wheel arch has four screws. Three that are horizontal and one that is vertical as shown in the photo below. You can also see where the clip holes are along the top edge from the wheel arch to the headlight location.
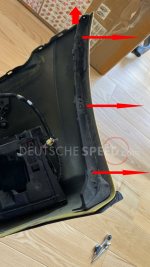
You've then got a series of screws underneath the car. My car has a splitter installed, so I opted to keep the "closing section" attached to the bumper by unscrewing the middle screws as shown:
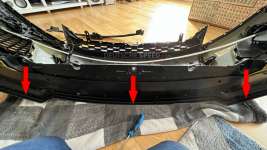
Then you have three on each side as shown here:
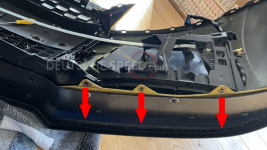
Once all of the screws are disconnected, you can pull the bumper out from the body from each side, by pulling from the edge at the wheel arch.
BE CAREFUL - At the passenger side front, your screen washer tube is connected as well as the wiring loom for the pedestrian protection sensor (and parking sensors if you have them). Make sure you don't yank the bumper off fully at the passenger side without first locating and disconnecting these plugs. For the washers, you just squeeze the two blue rectangles on the connector together and pull it off. You'll want to have a bung handy to push inside the tube, otherwise you're screen wash will drain all over the floor.
Installation is simply done in reverse.
First pop the bonnet and remove the bonnet release handle. At the top edge of the handle there's a pushclip that holds the handle in place. Lever this out with a small flat-head screw driver and you can now simply pull the handle off the spindle. IMPORTANT - DO NOT CLOSE THE BONNET WITHOUT THIS HANDLE BEING ON THE SPINDLE OR YOU'LL HAVE A NIGHTMARE GETTING IT OPEN AGAIN!
Next you're going to remove the trim piece around the handle spindle that runs along the top of the grill. You'll pull this up (trim removal tools are best) from the front edge and then pull it up and out towards you. You'll see that the rear edge clips into the top of the airscoop.
With this out of the way, you'll see two torx screws that hold the top of the grill to the chassis. You're going to remove these but it's worth taking a couple of photos first as there's some adjustment back and forth in order to line the top edge up with the lights and bonnet. If you take a couple of pics it'll help as a reference when you re-position it.
Rest of the bumper is held in by screws inside the wheel arches and underneath. It's also clipped into the bodywork. The photos below show you where the screws are that you need to remove:
Each wheel arch has four screws. Three that are horizontal and one that is vertical as shown in the photo below. You can also see where the clip holes are along the top edge from the wheel arch to the headlight location.

You've then got a series of screws underneath the car. My car has a splitter installed, so I opted to keep the "closing section" attached to the bumper by unscrewing the middle screws as shown:

Then you have three on each side as shown here:

Once all of the screws are disconnected, you can pull the bumper out from the body from each side, by pulling from the edge at the wheel arch.
BE CAREFUL - At the passenger side front, your screen washer tube is connected as well as the wiring loom for the pedestrian protection sensor (and parking sensors if you have them). Make sure you don't yank the bumper off fully at the passenger side without first locating and disconnecting these plugs. For the washers, you just squeeze the two blue rectangles on the connector together and pull it off. You'll want to have a bung handy to push inside the tube, otherwise you're screen wash will drain all over the floor.
Installation is simply done in reverse.
Last edited:

