moonstone
Tyre Kicker
Putting this guide up here for people searching for it on the internet. This is a complete guide on how to replace the lower front lip on all Taycan models. If you've found this page its most likely because you want to upgrade your standard lip to the the one found on the sports design package. Unfortunately, it's not a case of simply swapping over the lower lip, the grill surround is a different shape and so are the parking sensor brackets. It's worth noting that the official Porsche workshop manual states that whenever the front bumper is removed, the camera needs to be re-calibrated. Whereas that's a "belt and braces" scenario and I can see why the manufacturer would recommend it, it's not something that's been necessary for me on this car or others where I've removed and refitted cameras. It also mentioned re-calibration of the "front corner radar". My car doesn't have this and I've no definite idea of what it's for or what it is. Bear this in mind when deciding to do this DIY. Worst case scenario is you complete this and then get your local dealer to recalibrate them.
If you would like to upgrade from the standard lip to the sports design package lip, the following parts are required:
Many of the above parts can be purchase second hand on ebay currently. For any new parts, obviously a friendly dealer or LLLParts.co.uk, Suncoast in the states or Design 911 in the UK should be able to help.
Labour
In order to fit this lot, the whole front end of the car needs to come off and this is a bit more convoluted than some other cars as the front wheels, arch-liners, headlights and trim from under the Frunk/Bonnet needs to be removed. All this needs to be done to access the fixings that hold the front bumper section in place. The entire front bumper cover needs to be removed so that you can remove all of the old parts above and replace them with the new versions.
All-in this job took me around 3.5 hours to complete and that included making slots in the grill surround to attach the front camera housing. In order to access the fixings for the front bumper cover you need to get headlights out. You can either jack up one side at a time or both at once. I did one side at a time.
Tools required:
Bumper Removal
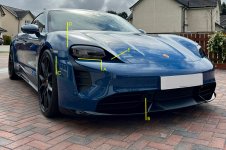
A - This is the location of the bumper clips under the head light. These are the sole reason the headlights need to be removed.
B - Notice the difference in this section that hold the PDC sensors and how the shape meets the new corner splitters.
C - This is where the second screw for the side repeater is roughly (on the inside of the bumper cover)
D - There is a small piece of black trim on this side of the headlight. It may help to remove it.
E - It's easy to not this trim section loose. You can pop it back into place from inside the bonnet, under the trim section that you removed to gain access to the screws at the top of the bumper cover.
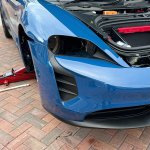
A - Top section and side sections unclipped to release lower trim section and access row of screws at B.
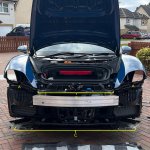
A - Locations of where upper clips insert.
B - Upper screw locations.
C - Lower screw locations.
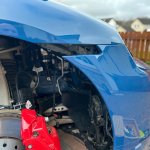
You can see where the side repeater goes in this photo.
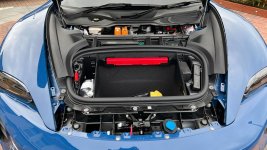
Here you can see all the under bonnet trim removed. Start at the top then the sides and finally the bottom to reveal the row of torx screws.
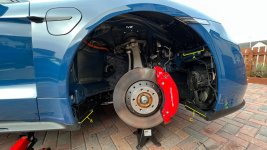
A - The two bolts that hold the headlight in place.
B - Screw locations for the very bottom of the wheel arch liner, accessed from underneath.
C - Screw locations for the bottom of the wheel arch liner at the front.
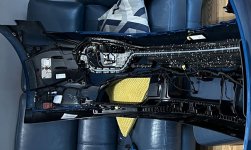
Inside view of the bumper cover removed with the lower grill and new lit fitted. In this photo the active aero fins have not yet been refitted.
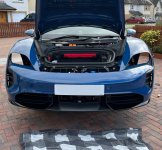
Above pic shows the bumper cover reassembled and refitted to the car prior to all screws being replaced.
If you need further details on getting the bumper cover off the following youtube videos might help:
If you would like to upgrade from the standard lip to the sports design package lip, the following parts are required:
| 9J1807541A0K1 | New lower lip (the painted sections clip into this). |
| 9J1807683BOK1 | Active aero grill surround ( the grill frame that the active aero flaps connect to and has the mountings for the parking sensors etc. Note that this part number varies depending on whether the donor car has the front camera installed or not. This particular part number is for a car that does have this. If you have a front camera installed as part of one of the surround view packages and you order this part from a car that doesn't, you 'll need to replicate two slots from your old grill surround for the camera bracket to clip into. |
| 9J1807819 & 9J1807820 | Two side splitter sections. When supplied new, these come primed for painting. The Carbon fibre versions have different part numbers and are (not surprisingly) much more expensive. |
| 9J1807595 & 9J1807596 | PDC mounting brackets. These clip into the the grill surround and house the front PDC sensors. If you look carefully at the new grill surround and the old one, the sections that house the PDC sensors are totally different. |
Many of the above parts can be purchase second hand on ebay currently. For any new parts, obviously a friendly dealer or LLLParts.co.uk, Suncoast in the states or Design 911 in the UK should be able to help.
Labour
In order to fit this lot, the whole front end of the car needs to come off and this is a bit more convoluted than some other cars as the front wheels, arch-liners, headlights and trim from under the Frunk/Bonnet needs to be removed. All this needs to be done to access the fixings that hold the front bumper section in place. The entire front bumper cover needs to be removed so that you can remove all of the old parts above and replace them with the new versions.
All-in this job took me around 3.5 hours to complete and that included making slots in the grill surround to attach the front camera housing. In order to access the fixings for the front bumper cover you need to get headlights out. You can either jack up one side at a time or both at once. I did one side at a time.
Tools required:
- Jack (& jack pad to use the standard jacking points)
- Axle stands
- Trim removal tools
- Assorted Torx screw drivers
Bumper Removal
- Jack the car up on one side using the front jacking point and slide an axle stand into a suitable place. My car has air suspension so I put it under the front suspension arm.
- Remove the wheel and set aside.
- Remove the wheel arch liner. All the fixings for this visible apart from a few underneath the car that mate the arch liner to the covers underneath.
- Once removed you want to disconnect the necessary wiring loom connections which are quite obvious as well as the connections to the side repeater on the wheel arch and the back of the headlight.
- Remover the centre cover on the lower grill that surrounds the front radar sensor (if Adaptive Cruise or InnoDrive is option) and the front camera (again if optioned). This clips off using trim remove tools from each side.
- To headlight is held on by two bolts underneath that, when loosened or removed, all the head light to slide out from the read towards the wheel arch. Be extra care when removing and refitting this as the lenses are plastic and there are some bodywork angles that could damage them.
- In order to remove the side repeater there is a screw that's hard to see that you access from underneath it as well as around the trim next to it. The one underneath is not immediately obvious and is lost in a small recess. Make sure you get it out or you'll break something trying to remove the side repeater.
- Next you need to remove the series of screws that run underneath the bumper cover from one side to the other. These are obvious. Take them all out.
- Finally you need to access the screws that hold the bumper cover to the top of the car. Open the bonnet/trunk and unclip the black plastic covers on either side of the main storage (the reveal the tire mobility kit and warning triangle). This allows you to unclip the black trim that runs either side of the bonnet opening. With these unclipped, you can unclip and release the section of trim that runs long the top of the bumper cover to reveal the series of screws that hold the bumper cover on.
- Underneath the apertures for the headlights, you'll see a black horizontal bracket that the bumper cover clips into. Using your trim removal tools, loosen this and free the clips. One side at a time. When you've done this, the entire front end of the car will be released and you remove it. Its a good idea to put some thick tape along these before you loosen them up to protect the paint work.
- Now that you have the bumper cover off. You can start to dismantle the lower grill section. All of the screws are underneath. Make sure you take a photo of the wiring loom and the active aero shutters etc, so you can refer to it when you're re-assembling.
- There's a lot of screws to content with here but they're all quite obvious. You need unclip the loom, release all the screws to dismantle everything one part at a time (some parts are overlayed on top of each other).
- With the grill assembly out the bumper cover is quite flexible and it's pretty tricky to get the new grill frame clipped into place. It's best to clip your painted corners into the lower lip, then put the new grill assembly in and screw it all up, then the new lip lower lip assembly. Pay attention to the parking sensors and remember to clip the new brackets in from the rear before putting the sensors in.
- Once this is all in place, you can take the bumper cover back to the car and reassemble everything in reverse.

A - This is the location of the bumper clips under the head light. These are the sole reason the headlights need to be removed.
B - Notice the difference in this section that hold the PDC sensors and how the shape meets the new corner splitters.
C - This is where the second screw for the side repeater is roughly (on the inside of the bumper cover)
D - There is a small piece of black trim on this side of the headlight. It may help to remove it.
E - It's easy to not this trim section loose. You can pop it back into place from inside the bonnet, under the trim section that you removed to gain access to the screws at the top of the bumper cover.

A - Top section and side sections unclipped to release lower trim section and access row of screws at B.

A - Locations of where upper clips insert.
B - Upper screw locations.
C - Lower screw locations.

You can see where the side repeater goes in this photo.

Here you can see all the under bonnet trim removed. Start at the top then the sides and finally the bottom to reveal the row of torx screws.

A - The two bolts that hold the headlight in place.
B - Screw locations for the very bottom of the wheel arch liner, accessed from underneath.
C - Screw locations for the bottom of the wheel arch liner at the front.

Inside view of the bumper cover removed with the lower grill and new lit fitted. In this photo the active aero fins have not yet been refitted.

Above pic shows the bumper cover reassembled and refitted to the car prior to all screws being replaced.
If you need further details on getting the bumper cover off the following youtube videos might help:
