Audi, Mercedes, Porsche, BMW Forum

Welcome to Deutschespeed.com the newly launched community for German Performance car lovers. The site is in it's launch phase at the moment and so content and membership is small (but growing). Soon we'll have competition prizes and and a live ad campaign to help build the community. If you'd like to be apart of what's going on, sign up and join in!

Retrofit Hold Assist Audi TT (8S)

moonstone

Tyre Kicker
Posts
3,158
Likes
1,671
Location
Lanarkshire
Drives
Audi R8 V10+ • Taycan GTS
"Auto Hold" is often confused with "Hill Hold". Hill hold is standard on DSG TTs (not sure about manual cars) and holds the brake a bit on a hill to make is easier for you to set off. Auto-hold on the other hand, holds the brake for you when you take your foot off when stationary and still in (D). Means you don't need to keep your foot on the brake at traffic lights or manually engage the handbrake.

I retrofitted his recently using Kufatec's kit (available here: https://www.kufatec.com/en/audi/tt/...o-hold-hill-start-assist-for-audi-tt-8s-41562)

This kit comprises a genuine VAG button that replaces your existing Parking Brake button, a OBD dongle that automates the coding process and a simple wiring loom. The instructions are pretty rubbish and are for a LHD car. They're not clear on various things and I went through a lot pain to fit this only to realise, in the end, that with the job is actually much simpler than it seems. (NOTE: This is why in some of my photo's the car has more trim stripped than I actually outline in my steps below)

The switch itself costs around £30-£40 and if you are a VCDS or OBDeleven user, it's possible to code this in yourself. The wiring loom requires a few female pin connecters that are designed to slot into the existing electrical connectors though so the best idea (if not going down the KUFATEC route) is to try and get a pre-made loom rather than try to make one yourself (unless of course, you have the kit to do so). Note that KUFATEC also sells the loom on its own.

PLEASE READ THIS ENTIRE POST IN ITS ENTIRETY AND MY FOLLOW UP POSTS BEOFRE STARTING.

Tools needed:
  • Trim removal tools
  • Cable rods / pullers
  • Philips screw driver
  • Electrical terminal extraction keys (https://www.ebay.co.uk/itm/225042597327) or a very small screwdriver to push out a couple of pin blanks on the ABS connector.
Summary of steps:
Here's an outline of the steps required before I get into the specifics.
  1. Loosen centre console trim to release the switch main switch bank and replace the switch.
  2. Run new wiring loom from switch connector to ABS module in the engine bay.
  3. Coding.
Method:

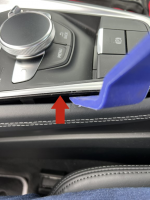
It doesn't really matter what order you decide to start with, but in this case I'll start with replacing the existing (P) button with the new unit. The whole control unit needs to be lifted out but rather than remove the centre console entirely you can simple remove the gear surround trim and pull the top of the edge of the MMI control unit up. Then using your trim removal tools, prise up the back end of the centre console unit to give you access to the rear set of clips that holds the MMI control unit in place. Once you release these, you can drop the centre console unit back down and then remove the two electrical connectors going to the MMI unit.
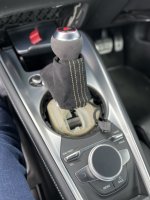
gear-surround-off.jpg

1661808923602.png

Below you'll see the two prongs at the rear that need to be squeezed to release the back of the MMI unit from the console.
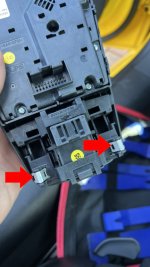
IMG_0728.jpg

Now that the console is out, there's a few small clips on the back that hold the switch in place. Pop it out and stick in the new one.
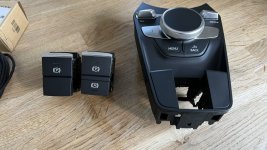
IMG_0730.JPEG

Now before you put the controller unit back in, you'll be adding a couple of wires to the connector, so leave everything out for the time being and head towards the engine bay. From the engine bay, we need to feed the supplied cable through a rubber grommet in the firewall through to the passenger compartment. It's really hard to photograph but just behind and to the right of the ABS Pump there's a larger grommet with the main wiring loom coming from it and a smaller rubber nipple sticking out below it. We're going to stick a hole in this with a philips head screw driver and feed the wiring loom through it. The wiring loom is going to join two cable from the ABS unit to the new switch.

In the KUFATEC kit, the wires are labelled with pin numbers on each wire. So feed the cable through the right way round. At the ABS Unit side, it's the two wires labelled Pin 23 & Pin 32.
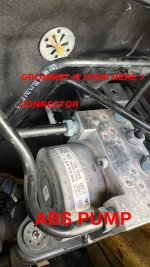
abs.jpg

In the photo below after you feed through your cable rod through the hole in the nipple, it'll come out into the cabin behind the glove box. You might get lucky and it wont end up behind the footwell trim but if it does, you'll need to remove that as shown in the pic. After that you can tape the wiring loom to it and pull it through into the engine bay.
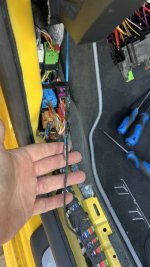
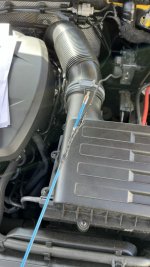
IMG_0742.JPEG

IMG_0744.JPEG

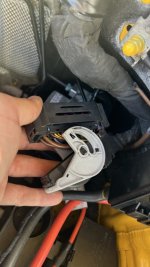
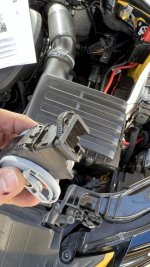
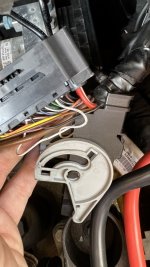
Next up we're going to remove the connector plug from the ABS unit, take the back off and then insert the pins from the wiring loom into it. In order to release the connector from the ABS unit you need to pull out a red tab by moving it downwards and that lets you release the grey lock before unplugging the connector itself
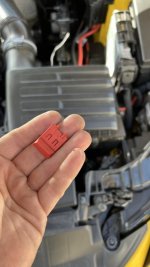
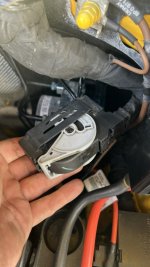
IMG_0745.JPEG

IMG_0747.JPEG

Now that the connector is released, you need to get the back off it to access the back of the connector. You do this by pressing in this slot and gently pulling the cover off.
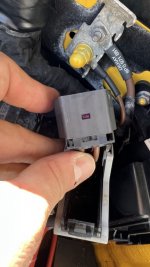
IMG_0748.JPEG
 
Last edited:

moonstone

Tyre Kicker
Posts
3,158
Likes
1,671
Location
Lanarkshire
Drives
Audi R8 V10+ • Taycan GTS
IMG_0749.JPEG

IMG_0751.JPEG

You'll also notice there's a cable tie. I snipped this off to give me more room to work with and then replaced it when I was finished.

IMG_0750.JPEG

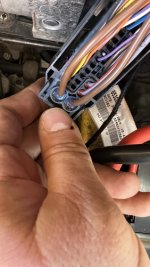
In the back of the connector the two pin locations that you want have got plastic plugs in there and you need to carefully release there using your pin extraction tools. This is tricky and I broke both of the plugs in half trying to get them out, which made the job a ballache but I got there in the end.

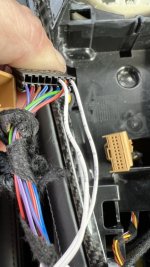
Once these are out, you just stick the two new cables in to pin 23 and pin 32 (white cables in the photo below).

IMG_0782.JPEG

Put everything back together again and plug the connector back into the ABS module. Now go back to the cabin.

Next stick a cable rod down through the hole in the centre console where the cable for the button is coming from and then tape the new wiring loom to it, you can then tuck it up from behind the glove box and along behind the centre console trim that meets the carpet and pull it out and through to the connector unit.

You're then going to plug in the labelled wires to pins 9 & 11. Note that if pin 10 is empty, you need to use the third wire to plug that into that location and then connect the other end to an ignition live in the fusebox behind the glove box.

IMG_0785.JPEG

Summary of pin connections
ABS CONNECTORBUTTON CONNECTOR
Pin 23 -><- Pin 11
Pin 32 -><- Pin 9

Once you've done that, plug the connectors back into the MMI controller unit, and refit it, before snapping the back of the centre console unit back into place.

Now all you need to do is turn on the ignition and plug the KUFACTEC module in for it to automatically code everything and you're done.

Example of how it should all work is here:


If you're not using the KUFATEC dongle for coding, the required coding steps using VCDS / OBDeleven are as follows:

ABS Module 03 Long Coding
Byte 15: Set bit 3 (Usually 06=>0E)
Byte 16: Set bit 7 (Usually 33=>B3)
Byte 25: Set bit 4 (Usually 60=>70)
Byte 26: Set bit 0 (Usually CC=>CD)

ABS Module 03 Adaptation
Security access: 20103
Adaptation: IDE05263-AUTO HOLD functionality => activated
 
Last edited:

moonstone

Tyre Kicker
Posts
3,158
Likes
1,671
Location
Lanarkshire
Drives
Audi R8 V10+ • Taycan GTS
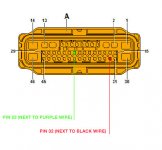
Just as an update to this, I fitted the Pin32 wire in the wrong place by misreading the numbers on the back of the ABS connector. I then spent two days chasing my tail trying to work out what was wrong till I realised what I'd done. So that you don't make the same mistake see below:

Firstly, this is a map of the connector which shows you what the pin numbers are.
pINMAP.jpg

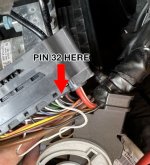
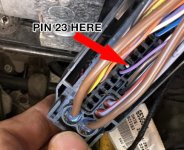
And here's photos of the actual connector showing where the wires should go (ignore the white wire in the first photo below as this pic was taken before I corrected my mistake)

PIN32.jpg PIN23.jpg
 

Brewsi

Tyre Kicker
Posts
8
Likes
1
Location
UK
Drives
Audi TT 8S sline TDI coupe
Hey great write up and easy to follow but having problem with coding it and also have a warning on dash about parking brake fault, using obd eleven the

abs mod 3 long Coding
Byte index 15 bit 3 06 to 0E - function not available
Byte index 16 bit 7 hex 24 to B3 function not available
Didn’t go any further to the other bytes 25 and 26

and help would be great on how to sort it out

thanks
 

moonstone

Tyre Kicker
Posts
3,158
Likes
1,671
Location
Lanarkshire
Drives
Audi R8 V10+ • Taycan GTS
Hey great write up and easy to follow but having problem with coding it and also have a warning on dash about parking brake fault, using obd eleven the

abs mod 3 long Coding
Byte index 15 bit 3 06 to 0E - function not available
Byte index 16 bit 7 hex 24 to B3 function not available
Didn’t go any further to the other bytes 25 and 26

and help would be great on how to sort it out

thanks

Dash error is normally down to wiring. Biggest issues are getting the pins wrong or there still being a bit of the grey plastic plug in one of the slots. It’s exceptionally difficult to get the entire plug out of the hole in one piece. Check that the pin is correctly seated and doesn’t come back out. If it does, chances are there’s still a bit of grey plug in there.

Forget about the coding until you get that bit sorted. Otherwise one could affect the other and you’ll be chasing your tail. However, the coding has to be done in one go or it will not be accepted as the bytes 25 & 26 are cross referenced with 15 & 16. If you only half of the coding then the coding won't be accepted.

If you're getting "function not available" it's because you're either in the wrong diagnostic mode for this function or the security code you've entered does not grant the level of access to make this change. But forget about the coding for the time being and focus on the cause of the dash errors,

When you run a scan using OBDeleven what is the fault it describes?
 
Last edited:

Frizzley

Tyre Kicker
Posts
45
Likes
25
Drives
TTS Roaster
Dash error is normally down to wiring. Biggest issues are getting the pins wrong or there still being a bit of the grey plastic plug in one of the slots. It’s exceptionally difficult to get the entire plug out of the hole in one piece. Check that the pin is correctly seated and doesn’t come back out. If it does, chances are there’s still a bit of grey plug in there.

Forget about the coding until you get that bit sorted. Otherwise one could affect the offer and you’ll be chasing your tail.

When you run a scan using OBDeleven what is the fault it describes?
Mines the same - have doubled checked the wiring and it looks correct.

OBD11 dongle arrived this morning - initial scan came back with AutoHold Fault Code C115614 but havnt been able to do anything more yet.

I did use the car after installing the button but before connecting to the abs pump - could this be the issue?
 

moonstone

Tyre Kicker
Posts
3,158
Likes
1,671
Location
Lanarkshire
Drives
Audi R8 V10+ • Taycan GTS
Mines the same - have doubled checked the wiring and it looks correct.

OBD11 dongle arrived this morning - initial scan came back with AutoHold Fault Code C115614 but havnt been able to do anything more yet.

I did use the car after installing the button but before connecting to the abs pump - could this be the issue?

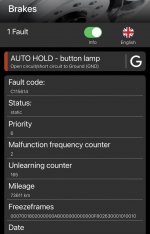
Fault Code C115614 is what I had as a result of having one of my pins at the ABS pump in the wrong place and is a wiring fault (open or short circuit to ground)

That suggests that you have made a mistake with the wiring or that there’s still a piece of the grey plug in the one of the pin holes in the ABS connector, that's preventing the pin from completing the connection to the button.

A63F3224-BB48-4687-8025-EF105F81EED6.jpeg

I drove my car around for a couple of days with the same fault and warning lamps on the dash before I sorted it, so having done a partial instal won’t cause any issues.
 
Last edited:

Brewsi

Tyre Kicker
Posts
8
Likes
1
Location
UK
Drives
Audi TT 8S sline TDI coupe
Hi, thank for quick reply will take a look again at abs plug and see if any thing in there, when I pulled the plastic pin out it came in one piece but will see
 

moonstone

Tyre Kicker
Posts
3,158
Likes
1,671
Location
Lanarkshire
Drives
Audi R8 V10+ • Taycan GTS
Hi, thank for quick reply will take a look again at abs plug and see if any thing in there, when I pulled the plastic pin out it came in one piece but will see

I thought the same thing but both pin holes still had a bit in there that I couldn’t even see until I pushed it out from the other side.

If it’s the same fault code as @Frizzley it’s definitely a wiring issue.
 

Brewsi

Tyre Kicker
Posts
8
Likes
1
Location
UK
Drives
Audi TT 8S sline TDI coupe
Been at it for a couple of hours and sure the wires are in the correct place and there is no obstructions to the pins and no fault codes but tried to code it and it keeps saying “function not Available”


abs mod 3 long Coding
Byte index 15 bit 3 06 to 0E - function not available
Byte index 16 bit 7 hex 24 to B3 function not available

should I be doing this in a certain order like Byte 15 then byte 25, 16 then 26…
 

moonstone

Tyre Kicker
Posts
3,158
Likes
1,671
Location
Lanarkshire
Drives
Audi R8 V10+ • Taycan GTS
Been at it for a couple of hours and sure the wires are in the correct place and there is no obstructions to the pins and no fault codes but tried to code it and it keeps saying “function not Available”


abs mod 3 long Coding
Byte index 15 bit 3 06 to 0E - function not available
Byte index 16 bit 7 hex 24 to B3 function not available

should I be doing this in a certain order like Byte 15 then byte 25, 16 then 26…

Ok. So at least you've sorted the wiring issue. So we can move on from that.

I did the coding using the Kufatec dongle. But before I solved my own wiring issue, I did delve into the coding via OBDEleven and there's a couple of things that you need to know. Firstly, if you're not in the the proper Connection mode in OBDeleven certain changes are not available so you need to experiment. Secondly, there are various security codes that each Control Unit will accept, but not all of them allow certain changes, so again, you need experiment.

Thirdly, the terminology you're using above leads me to question if you're following the correct process to make changes. For example - you said "Byte Index 15, bit 3" - The bits make the byte. So in this case you're not changing bit 3 at all, you're simply changing the byte (which in turn changes the individual bits). The bits are in binary and the byte is in Hex.

The coding instructions that you're trying to make are well-documented but contrary to the bit-byte instructions above, I was also unable to fully change these using OBDeleven, but the KUFATEC dongle didn't do the mirroring-changes either. So my own coding (double checked tonight for you) is as follows:

Byte 15 - 0E
Byte 16 - A2
Byte 25 - 70
Byte 26 - 45

This is what the KUFATEC dongle has done and my autohold is working as it should. Might be worth trying this but again, you may need to experiment with different connection modes and security codes to make the changes.
 

Brewsi

Tyre Kicker
Posts
8
Likes
1
Location
UK
Drives
Audi TT 8S sline TDI coupe
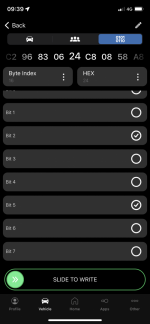
That’s for the help and advice, just so I am right with OBD Eleven and the correct way to code it as maybe not going it right. So go to 03 Brakes module, long coding, byte index 15, bit 3, change HEX from 06 to 0E … is this correct.

thanks
 

Attachments

  • 11BC2B49-2819-4796-96F0-45E0B358CBB4.png
    11BC2B49-2819-4796-96F0-45E0B358CBB4.png
    156.8 KB · Views: 5

moonstone

Tyre Kicker
Posts
3,158
Likes
1,671
Location
Lanarkshire
Drives
Audi R8 V10+ • Taycan GTS
That’s for the help and advice, just so I am right with OBD Eleven and the correct way to code it as maybe not going it right. So go to 03 Brakes module, long coding, byte index 15, bit 3, change HEX from 06 to 0E … is this correct.

thanks
SHORT VERSION:
No. You’re not changing or selecting any of the bits. When you change the hex for the byte, that changes the bits automatically.

...and make sure you change all four bytes required and then slide to write. Don't try to write after each individual one.

LONG VERSION:
FYI - In binary, a byte is made up of 8 bits (a bit can be a 1 or a 0 - the check boxes are not for selecting the bit, they are for changing them. So a "tick" is a one, no tick is a zero). In decimal where we have tens and units. A 10 is made up of ten units. So in binary the byte is the equivalent to a ten and the bit is equivalent to a unit.

Hexadecimal is another numbering system that allows the 8 digits in a byte to be represented by two digits. So the bottom line is that when you change the HEX value this trickles down to changing the bits. So in OBDeleven you can either manually select the combination of bits OR change the HEX value, to achieve the same result.
 
Last edited:

Brewsi

Tyre Kicker
Posts
8
Likes
1
Location
UK
Drives
Audi TT 8S sline TDI coupe
Hi,

so that where I am going wrong trying to slide to write on each bit. So change all 4 of the bits 15,16,25,&26 and on the 26 one slide to write ….

I will have a go at the weekend as working during the week away and let you know

thanks again
 

StuartK

Chief Engineer
Posts
748
Likes
183
I could not put this tutorial up. It is very informative but it tells the whole forum that you have a TT.

When is the skin fade tutorial coming? :D
 

moonstone

Tyre Kicker
Posts
3,158
Likes
1,671
Location
Lanarkshire
Drives
Audi R8 V10+ • Taycan GTS
You have completely missed the TT thread then Stu?

Yeah get with the programme @StuartK theres about five of us all with TTs and three of them are bright yellow!


Brewsi

Tyre Kicker
Posts
8
Likes
1
Location
UK
Drives
Audi TT 8S sline TDI coupe
Ok got the long coding sorted ok but can’t get the Green P on the dash to activate, it says function not available, am I missing something somewhere.

thanks
 
Top